
Cobra has a feature that not everyone knows about that can change the way you think about working with Cobra. This feature has been around forever, but most folks don’t use it or aren’t even aware it exists. Even if they have heard of it, they are not sure how to leverage its capabilities. That feature is the Cobra Batch Processing and it can literally change how you work with Cobra.
Cobra does not really have an easy way to automate process steps through the user interface. Even with the ability to save integration files, you cannot weave that step together with another process step, or steps, to get things down to the minimal button clicks. But there is a way to do this if you look outside the standard Cobra interface.
Cobra Batch Processing
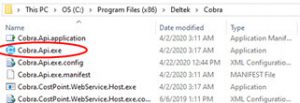 Cobra’s batch capability is available through an executable file that gets installed with your existing Cobra install called Cobra.Api.exe. This exe, when called, reads a text file of instructions that can include the most common process steps in Cobra, without having to click buttons! The best part is because its installed with your existing Cobra its FREE!! (ok, maybe not free, but there isn’t anything you have to buy or install to use it)
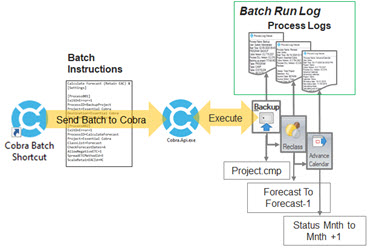 From a 30K foot level, the Cobra.API.EXE is a copy of the Cobra.exe that can read instruction files (text files) and process those instructions. Those instructions can includes information to process most of the most popular processes that are available through the normal Cobra interface (think the Cobra Processes menu plus). As of this writing there are over 30 individual process that you can call and Deltek regularly adds capabilities. And the really cool thing is that multiple processes can be woven together to encompass all the button clicks for an entire process step like start monthly reporting process. So that means you can put into a single batch process the instructions to backup a project (always good before a major process step), copy current forecast values to an archived class (archiving last month’s forecast for trending) and then when that’s all done advance the calendar.
Process Instructions
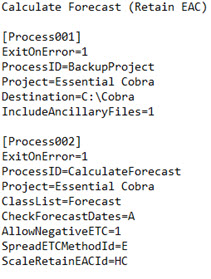
The heart of the batch instructions is the Process section. This is where you list out the process you want to run, what file you want it to run against and what options you want it to use when running. Think of the options as the choices you get when running a process through the process wizard, because that’s what they are. Anything you can select in the wizard for a process will be an option you can set with your batch instructions. We’ll look at these in detail in a minute. Keep in mind that you can include multiple processes within a single batch instruction text file.
So lets look at the process section in more detail:
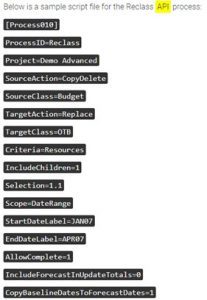 Each process you include in your instructions will need to be identified with a Process Header. This is the [Process010] in the example to the left. This header tells Cobra that the lines following it will define what and how to run a process. Each process in your instructions needs to have this line and it always needs to be [ProcessNNN] where NNN is the three digit identifier between 001 – 999.
The next required line in the ProcessID. This will tell Cobra which process you want it to run. This is the [ProcessID=Reclass] line in our example. Each process has its own unique ProcessID that you can look up in the Help by searching for “Process Sections of the API Script”. You will find all the available processes and their process id’s there.
The next thing is the file you want to run the process using. For example, [Project=Demo Advanced] in the example here. This is just like the first screen of any of the process wizards in Cobra so far. You select the process and Cobra verifies what project you want to run the process against. The cool thing about doing this through the Cobra.API.exe is that all your security rules and business process rules will still be applied when you run this. That means, even if I enter a project name into the instructions, Cobra will only run the process if I have access to the project through the normal Cobra interface.
After you have told Cobra what process you want to run and on what project, you can list out the settings you want Cobra to use when running the process. This is what all the additional lines in our example are. Some settings will be required, like the “SourceClass=” when doing a reclass, and others will be optional, like “AllowComplet=”. The Cobra help has a full listing of all the options per process and wether they are optional or required. The help also has examples of what a valid entry will be for each option. In some cases it’s a simple “0” or “1” (yes or no) and others will allow entries like class names, dates, etc.
Multiple Process Per Batch
Batch Instructions
Launching The Batch
Once you have your batch instructions filled out, the next thing you need to do is setup how you are going to launch it. The batch can be triggered via a command line from a shortcut on your desktop or even a custom menu item in Cobra. Anything that can send a command line will work, including a server schedule tool. In this example we’ll look at using the desktop shortcut.
There are two key elements that need to be included in your command line. The location of the Cobra.API.exe and the location of batch instructions. In addition, if you do not have Windows Authentication turned on for your Cobra installation, you will also need to include the UserID and password.
You need to enter the full path for where the Cobra.Api.exe is located. This should be in the same folder as your regular Cobra.exe is located and can be on a server. If you are launching this on a server its best to use the Universal Naming Convetion for the path (i.e. \\server1\Deltek\…) so you don’t have to worry about network drive mappings.
The same thing applies for the batch instructions. These will be the text file that has the list of instructions and you’ll need the full path for this as well. This path needs to be preceeded by “script:” so Cobra knows that what comes next is the location of the instructions.

Cobra batch shortcut Line
If you do not have Windows Authentication turned on in Cobra (i.e. you have to log into Cobra when you launch it), you will need to include the UserID and password. This information needs to be proceeded by “user:” so Cobra knows its reading the login information.

Cobra Batch Shortcut with Login info
Keep in mind that if you enter login information in the link you need to be careful who is going to be able to view this information. Ideally you’ll have Windows Authentication turned on and not have to worry about this.
Once you have the command line figured out you can add it to the “Target:” field of a shortcut on your desktop, for example, or add it to a Cobra Custom Menu item.
Running A Batch Process
Once you have your batch instructions setup and your shortcut (or custom menu item) you can simply click the shortcut (or select the menu item) and Cobra’s API.EXE will take care of the rest. It will read through the instructions and run the processes in sequential order. For each process it runs, Cobra will produce the same log file that it would have if you’d run the process through the regular interface. Cobra will also produce a log for the Batch Process itself, listing out what its run and if there were any issues in running the batch.
This blog just scratches the surface on what you can do with Cobra’s batch processing. Once you start using the feature you will realize all the things that could be done with just a single button click! In future blog posts I’ll dive into more of the settings you can use in the instructions and on the command line that expand the flexibility of this feature and we’ll talk about adding real-time selections for your batch to make it even more powerful!
Want an example script to automate the start of your business process? Email me at [email protected] and I’ll send you batch instructions to backup, archive forecast data and advance your calendar in one simple step.
Recent Comments