
Cobra’s reporting capabilities are vast. The out of the box reports only scratch the surface of what you can do with the Cobra reporting engine. With the ability to write your own custom report templates, the sky is the limit. But there are somethings you can do the through the basic reports screens that can change how you use Cobra reports. In this post we will look at three simple hacks to increase the reporting functionality without having to touch a report template.
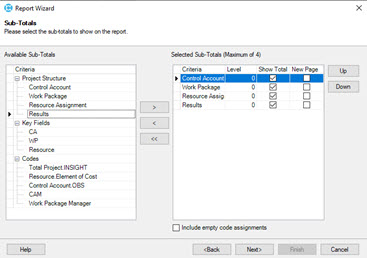
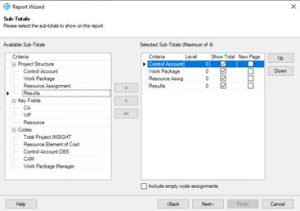
1) Increase Sub-Total Levels
Cobra Report Options
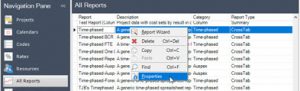 Find the report you want to update, for example the Time Phased report on the Reports view of the Cobra Explorer, right click and then select Properties.
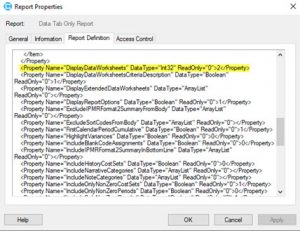
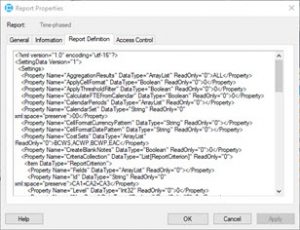 From the Properties window you can click on the Report Definition tab. This is where all the settings for the report are stored in an xml format. This view can be a little tricky to read, but we will walk through finding the line we are looking for.
First, click anywhere in the middle of the screen. This will jump you down to the bottom of the screen. Not sure why it does this, but for what we need this is perfect because the setting we are looking for is at the bottom of the script.
Look for the line that starts with
Click Apply or OK and then run the report on a project. You will notice when you get the Sub-Totals page you can now enter as many as 10 levels!
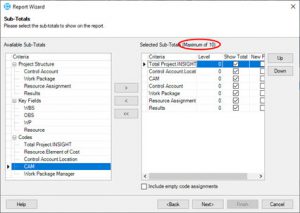
Increased Sub Total Levels
2) Produce a Data Tab Only Report
For all the things you can do with formatting in the Cobra reports, sometimes you just want to dump the data out. This is particularly helpful if you want to pivot on the data in Excel. You can accomplish this with the reports just the way they are, but you end up ignoring or removing the Report and Calendar tabs which is just wasted effort. Worse, all that formatting makes the report run slower. If in the end you just want a tabular format for your data based on your selections those extra steps and the slower response time can be frustrating.
The quick answer is to modify the Report Properties to just include the Data tab. We are going right back into the Report Properties like we did above, but this time you are going to want to save a copy of the standard report, making the Sub-Total, etc. selections you want to include. Now you can modify the properties of this new report without impact the standard report.
Cobra Report Properties
The line is highlighted here in the example. By default, that entry will be set to ‘0’, which includes all the tabs. But if you change that entry to 2 and apply the change you will tell Cobra to not produce the Report tabs (Report & Template).
The resulting report will default to the Data tab and you will be ready to pivot or link to this report (plus it will run faster).
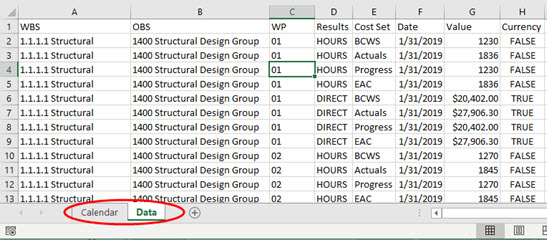
Cobra Report with WP ID
Bonus hack: If you set that same Parameter to 1 you will only see the Report tab, no Data or Calendar tab!
3) Filter Based on Thresholds
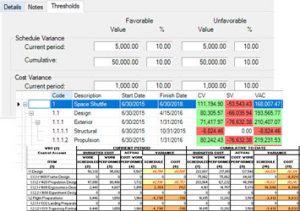
Cobra Thresholds
They drive the color coding in everything from the Project View in the Cobra Explorer to the Analysis tool and even the highlighting in the IPMR reports. But you can focus the report further by having the content of the report filtered down to just the elements that break a threshold without having to create a filter in Cobra. This is particularly helpful for Variance Analysis Reports (VARs) where this option will filter the report down to just the elements that require a VAR instead of having to wade through all the elements regardless of whether they break a threshold or not.
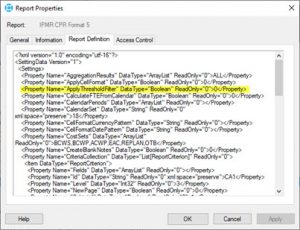
Cobra Report Properties
By default this option is set to 0 which means don’t filter the results. Changing this option to 1 turns on this filter so that only elements that break a defined threshold will be included in the report. No additional filters need to be set at the time of running the report.
The resulting output will be focused down to just the elements that need to be addressed.
Before:
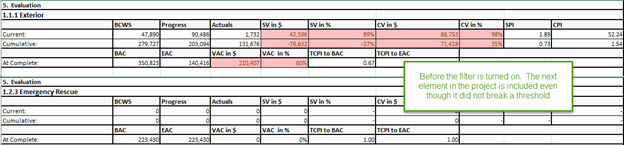
Cobra Report Thresholds Not Filtered
After:
These three quick tweaks to your report properties open lots of new possibilities with Cobra’s reports all with three simple changes and we have not even covered all of the things you can do with the Report Properties.
If you are interested in more quick tricks for Cobra reporting send an email with “Feed Me More Reporting Tricks” and we’ll send you an expanded list of things you can do with the Report Properties.